Class 10 Physics Summer Vacation Project Ideas 2024-25: School projects are more than just assignments- they are the way to make learning fun and exciting. As you work on your school project you’ll discover new things and make new discoveries. School projects will let you get out of your textbook and provide hands-on-experience. It will develop your skills such as problem solving, and analysis. Students will learn to think critically and find the solutions to challenges, which will help them to learn and grow. Check out the simple physics project ideas for class 10 students.
Class 10 Physics Project Ideas for Summer Vacation 2024-25
Students can understand Physics class 10 lessons better by doing experiments, projects and making models. These activities will help students to see how the things you learn in theory actually works in real life. To make it easier for you we have listed some simple physics project ideas for class 10 below for your reference:
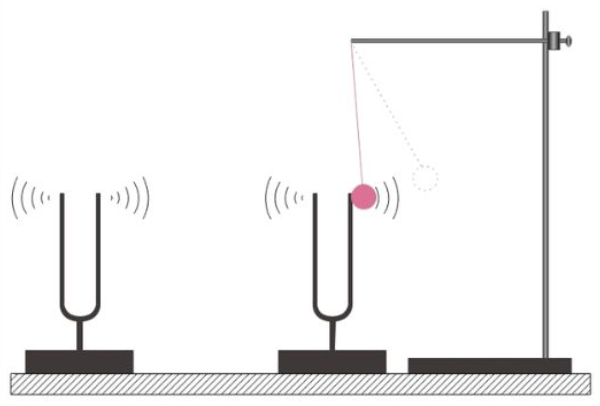
1. Simple Pendulum Project
Material required -
- String (around 1 meter)
- Bob (a small, heavy object like a nut, marble, or small ball of clay)
- Stand (a sturdy object like a meter stick, ruler, or ring stand)
- Protractor (optional)
- Stopwatch or timer
Procedure -
- Tie the Bob: Safely tie one end of the string to the bob.
- Attach to Stand: Tie the other end of the string to the stand, by creating a suspension point from which the bob can swing freely. Making sure that the string hangs straight.
- Set Up the Starting Position: Softly pull the bob to one side, displacing it from its resting position (straight down). This is called the initial displacement. You can use a protractor to measure the angle of displacement.
- Start the Timer: Once you release the bob, start the stopwatch and record the time it takes for the bob to complete 10 swings. This is called the period of the pendulum.
- Repeat and Analyze: Repeat step 4 several times, changing the length of the string each time by making the string shorter or longer. Record the length of the string and the time period for each trial in a table.

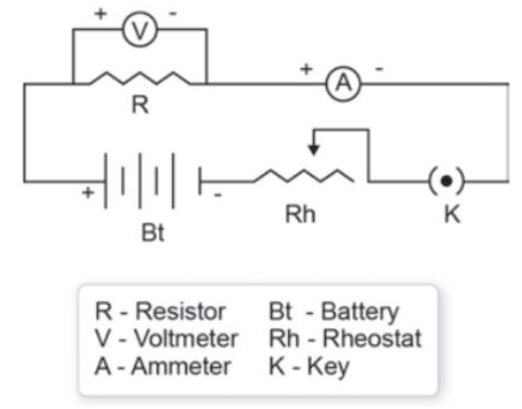
2. Ohm’s Law Verification Project
Material required -
- Battery
- Resistor
- Connecting wires
- Ammeter
- Voltmeter.
- Notepad and pen
Procedure -
- Be safe! Adult supervision is recommended for such electronic experiments.
- Build the circuit: Connect the battery, resistor, ammeter, and voltmeter by following a diagram (online or textbook) with the help of teacher/ under adult supervision.
- Get readings: Turn on the circuit carefully and record voltage and current reading correctly.
- Repeat: Change the resistors and repeat the steps 3 and 4.
- Analyze: Calculate resistance (voltage divided by current) and compare to resistor values.
3. Sound Waves and Frequency Relationship Investigation
Material required -
- Metal ruler (or other long, flat object)
- String (different lengths)
- Table or sturdy surface
- Book or other object to hold the ruler
- Pencil and paper
Procedure -
- Play: Put the ruler on the book with string hanging off. Pluck it - what sound did you observe?
- Shorten, Pluck, Listen: Shorten the string and pluck again. How does it change, did you feel any change in sound? Shorter strings usually make higher sounds!
- Record: Write down your observations. Shorter strings usually make higher pitch, longer strings make lower pitch.
- Secret: Faster wiggles (shorter string) mean more wiggles per second (frequency), affecting pitch!
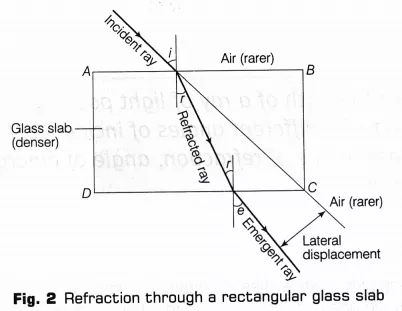
4. Tracing Path of a Ray of Light Passing Through a Glass Slab
Material Required -
- White sheet
- Soft drawing board
- Thumb pins (4+)
- Glass slab
- Sharp pencil
- Protractor
- Ruler
Procedure -
- Set up: Draw a rectangle on a sheet, mark a point (E), and draw a normal line (EN).
- Angle & Pins: Use a protractor for an angle of 30° from the normal line. Place the glass slab and adjust the pins (P & Q) on the angled line until all the four pins appear in a straight line when viewed through the glass.
- Lines & Measurements: Remove the glass, join newly marked points (R & S), and draw a normal line (N'M') from their intersection (F). Join E and F, then measure angles and lateral displacement.
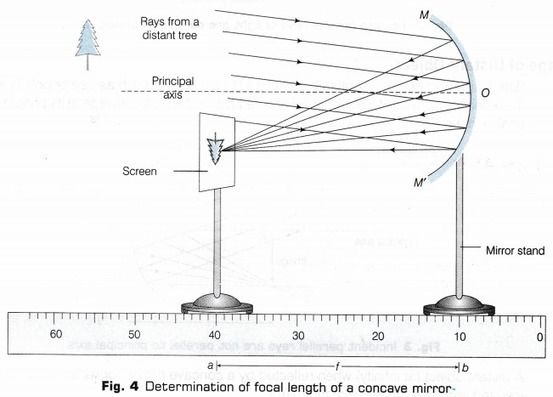
5. Determination of Focal Length of Concave Mirror and Convex Lens
Material Required -
- A concave mirror
- A measuring scale
- A screen holder
- A mirror holder
- A mirror stand
Procedure -
- Set up: Find a large space and position the mirror facing a distant object.
- Focus the image: Place a screen in front of the mirror and adjust it until you get a clear, sharp image.
- Measure: The distance between the mirror and the screen is the focal length.
Also Check : NCERT Books for Class 10 (All Subjects)

: Buddha Purnima, Rajiv Gandhi Death Anniversary, Pune Porsche Accident, and Other News in English")


Comments
All Comments (0)
Join the conversation